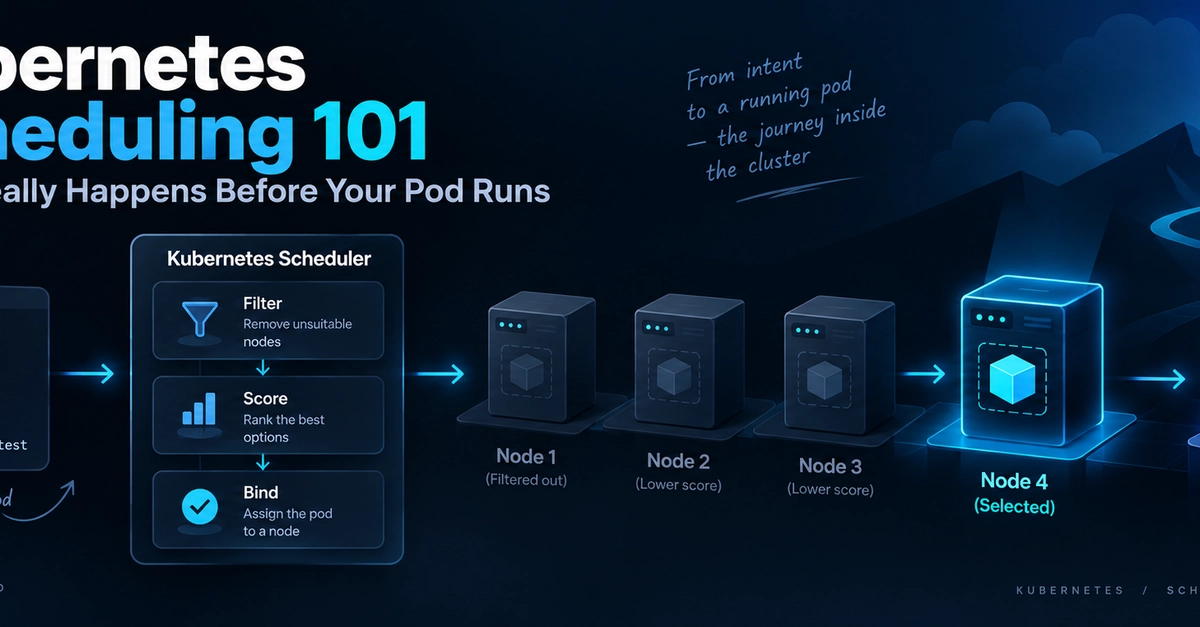
The Core of Kubernetes Scheduling: Binding Pods to Nodes
When you deploy an application to Kubernetes, you don't explicitly tell it which machine to run on. Instead, you define a Pod, a group of one or more containers that share storage and network resources, and let Kubernetes handle the placement. This process, known as scheduling, is the critical step that binds a Pod to a specific Node. Essentially, it involves setting the spec.nodeName field for the Pod. While you can manually dictate this name, the default and most common approach relies on the kube-scheduler, Kubernetes' built-in scheduler component.
The kube-scheduler operates on a two-phase strategy: filtering and scoring. This ensures that a Pod is not only placed on a Node capable of running it but also on the *best* available Node according to defined criteria.
Phase 1: Filtering - Eliminating Unsuitable Nodes
Before the scheduler even considers which Node is ideal, it must first identify which Nodes are even capable of running the Pod. This is the filtering phase. The scheduler consults various information sources, including the Pod's resource requests (CPU, memory), node labels, taints, and other constraints. It effectively asks: "Which Nodes can *physically* or *logically* run this Pod?"
Several common filtering predicates are applied:
- PodFitsResources: This is a fundamental check. Does the Node have enough allocatable CPU and memory to satisfy the Pod's
requests? If a Pod requests 2 CPUs and a Node only has 1 CPU available, it's filtered out. - PodFitsHostPorts: If the Pod specifies host ports (e.g.,
hostPort: 80), the scheduler checks if those ports are already in use on the Node. - PodFitsName: This predicate ensures that if a Pod has a
spec.nodeNameexplicitly set, it only considers that specific Node. - MatchNodeSelector: The scheduler checks if the Node's labels match the
nodeSelectorspecified in the Pod's definition. For example, if a Pod hasnodeSelector: {"disktype": "ssd"}, only Nodes with the labeldisktype=ssdwill be considered. - PodFitsTolerations: Taints are applied to Nodes to repel Pods. Tolerations, defined in the Pod spec, allow Pods to run on Nodes with matching taints. This predicate checks if the Pod can tolerate any taints present on the Node.
- NoVolumeConflict: For Pods requesting volumes, this predicate ensures that the Node has access to the required volume and that there are no conflicts (e.g., attempting to attach a volume that is already attached exclusively to another Node).
After this phase, the scheduler has a list of Nodes that are candidates for running the Pod. If no Nodes pass the filtering stage, the Pod remains in a Pending state, waiting for suitable resources or conditions to become available.
Phase 2: Scoring - Ranking the Remaining Nodes
Once the filtering phase has narrowed down the possibilities, the scheduler moves to the scoring phase. Here, the remaining Nodes are evaluated based on various scoring functions, aiming to find the *most suitable* Node. Each Node receives a score, and the Node with the highest score is typically chosen. This phase is highly configurable, allowing administrators to prioritize specific scheduling behaviors.
Common scoring priorities include:
- LeastRequestedPriority: This prioritizes Nodes that have the least amount of resources (CPU, memory) already requested by existing Pods. The idea is to spread Pods evenly and leave more resources available on each Node for future Pods.
- BalancedResourceAllocation: This aims to balance the resource usage across Nodes. It favors Nodes where adding the new Pod would result in the most balanced distribution of CPU and memory utilization.
- NodeAffinityPriority: This gives higher scores to Nodes that match the
nodeAffinityrules defined in the Pod spec. Node affinity allows you to express preferences or hard requirements for running Pods on specific Nodes based on their labels. - TaintTolerationPriority: While tolerations are checked during filtering, this scoring function can prioritize Nodes that have taints the Pod tolerates, especially if those taints are meant to steer specific workloads.
- ImageLocalityPriority: If a Pod's required container images are already present on a Node, that Node receives a higher score. This reduces image pull times and speeds up Pod startup.
The scheduler sums up the scores from all applicable priority functions. The Node with the highest aggregate score is selected. If there's a tie, Kubernetes might use a deterministic tie-breaking mechanism, often based on Node name.
Manual Scheduling: Bypassing the Intelligence
Kubernetes allows for direct, manual scheduling by specifying the spec.nodeName field in a Pod's definition. When you do this, the kube-scheduler is entirely bypassed. The Pod is immediately bound to the Node you named. This seems convenient for specific use cases, like ensuring a critical Pod always runs on a particular high-performance machine.
However, this bypass comes with significant drawbacks. Manual scheduling skips the entire filter-and-score process. This means Kubernetes doesn't perform the crucial checks to ensure the Node has sufficient resources, doesn't consider port conflicts, and ignores any affinity or anti-affinity rules that would normally help maintain cluster stability and efficiency. It's like telling a moving company exactly which truck to use without letting them check if the furniture will fit or if that truck is even available.
Pod Lifecycle and Eviction
Once a Pod is scheduled and running, it typically stays on its assigned Node for its entire lifecycle. Kubernetes does not automatically reschedule Pods if a Node becomes underutilized or if a better-suited Node becomes available later. The primary mechanism for moving a Pod is through eviction, usually triggered by Node conditions like memory pressure or disk pressure, or by administrator actions like cordoning a Node.
The exception to a Pod's static placement is when a NoExecute taint is applied to a Node. A NoExecute taint will cause Pods that do not tolerate it to be evicted. This is a powerful tool for managing Node maintenance or dealing with failing Nodes, ensuring that workloads are moved to healthy infrastructure. Understanding taints and tolerations is crucial for advanced scheduling strategies and maintaining cluster health.
The Importance of the Scheduler
The kube-scheduler is more than just a dispatcher; it's a critical component for efficient and stable Kubernetes cluster operation. By intelligently filtering and scoring Nodes, it ensures that Pods are placed where they can run reliably, resources are utilized effectively, and the overall health of the cluster is maintained. While manual scheduling offers a shortcut, it sacrifices the safety nets and optimizations that make Kubernetes a robust platform. For most use cases, letting the kube-scheduler do its job is the recommended approach, with configurations fine-tuned through Node Selectors, Affinity rules, and Taints.