Install Docker on Ubuntu 26.04: The Official Method
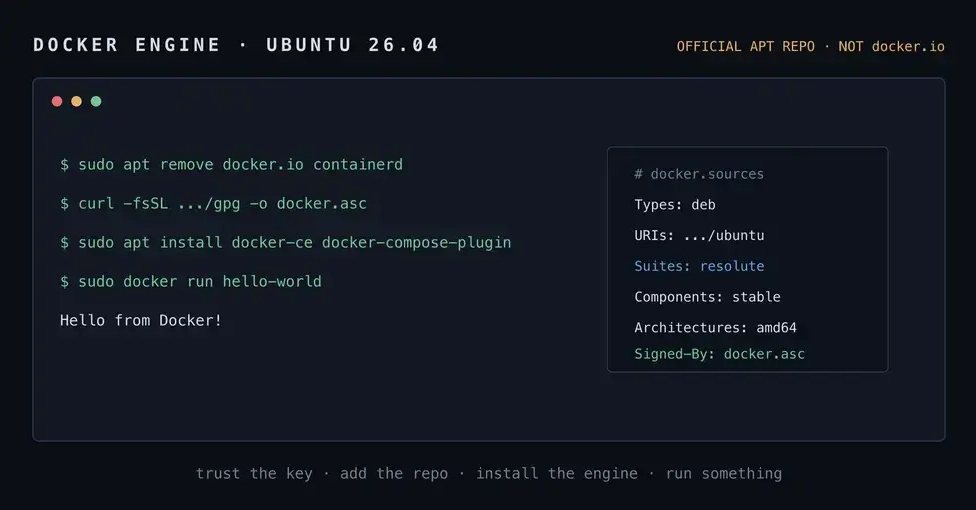
Installing Docker on Ubuntu 26.04 might seem straightforward, but taking the path of least resistance—sudo apt install docker.io—leads to an outdated version. This package often lags months behind official releases and notably lacks crucial plugins like Compose and Buildx. For a robust and up-to-date Docker experience, you must use Docker's official APT repository. This guide details the correct procedure.
Prerequisites and Cleanup
Before proceeding, it's essential to remove any existing Docker-related packages installed from the Ubuntu distribution repositories. This ensures a clean slate and prevents conflicts.
Execute the following commands to uninstall old versions and related components:
sudo apt-get remove docker docker-engine docker.io containerd runc
sudo apt-get autoremove --purge
This step is critical. If you skip it, you might encounter unexpected behavior or fail to install the official Docker version correctly. The goal is to clear the way for Docker's own package management system.
Setting Up Docker's Official APT Repository
To install Docker from its official source, you need to add Docker's GPG key and configure the APT repository. This ensures that your system trusts the packages downloaded from Docker.
1. Install Necessary Packages
First, ensure your system has the `ca-certificates`, `curl`, and `gnupg` packages installed, which are required for managing repositories and GPG keys.
sudo apt-get update
sudo apt-get install ca-certificates curl gnupg
2. Add Docker's Official GPG Key
Download the Docker GPG key and add it to your system's keyring. This key is used to verify the authenticity of Docker packages.
sudo install -m 0755 -d /etc/apt/keyrings
curl -fsSL https://download.docker.com/linux/ubuntu/gpg | sudo gpg --dearmor -o /etc/apt/keyrings/docker.gpg
sudo chmod a+r /etc/apt/keyrings/docker.gpg
3. Set Up the APT Repository
Create a new APT sources file for Docker. This file tells APT where to find the Docker packages. The `deb822` format is modern and recommended.
echo
  "deb [arch=$(dpkg --print-architecture) signed-by=/etc/apt/keyrings/docker.gpg] https://download.docker.com/linux/ubuntu
$(. /etc/os-release && echo "$VERSION_CODENAME") stable" |
  sudo tee /etc/apt/sources.list.d/docker.list > /dev/null
This command dynamically determines your Ubuntu version's codename and configures the repository accordingly. It ensures you receive packages compatible with your specific Ubuntu release.
Installing Docker Engine
With the repository configured, you can now install the latest version of Docker Engine, including Docker CLI, Containerd, and Docker Compose.
1. Update APT Package Index
Refresh your APT package list to include the newly added Docker repository.
sudo apt-get update
2. Install Docker Packages
Install the Docker packages. This command installs the Docker Engine, the command-line interface, and supporting components.
sudo apt-get install docker-ce docker-ce-cli containerd.io docker-buildx-plugin docker-compose-plugin
This command installs `docker-ce` (Community Edition), the client (`docker-ce-cli`), the container runtime (`containerd.io`), and the essential plugins (`docker-buildx-plugin`, `docker-compose-plugin`).
Verifying the Installation
After installation, verify that Docker is running correctly by checking its status and running a test container.
1. Check Docker Service Status
Ensure the Docker service is active and running.
sudo systemctl status docker
You should see output indicating the service is active and running.
2. Run a Test Container
The classic way to test Docker is by running the `hello-world` container.
sudo docker run hello-world
If successful, this command will download a test image and run a container that prints an informational message and exits. It confirms that Docker is installed and functioning correctly.
The `docker` Group: Understanding Privileges
A critical aspect often overlooked is managing user privileges for Docker commands. By default, running Docker commands requires `sudo`. Adding your user to the `docker` group allows you to run Docker commands without `sudo`, but this effectively grants root-level privileges.
Why the `docker` Group is Powerful (and Risky)
When you add a user to the `docker` group, that user gains the ability to run any command as root. This is because the Docker daemon runs as root, and the `docker` group has unrestricted access to communicate with it. Effectively, members of the `docker` group can start containers that mount sensitive host directories or execute arbitrary commands on the host system with root privileges.
Think of it less like giving someone a key to your house, and more like giving them the master key that can unlock any door, including the one to the fuse box. They can do helpful things, but they can also cause significant damage or gain complete control.
Adding Your User to the `docker` Group
To run Docker commands without `sudo`, add your user to the `docker` group:
sudo usermod -aG docker $USER
After running this command, you must log out and log back in for the group membership to take effect. Alternatively, you can use the `newgrp docker` command in your current terminal session, but logging out and back in is generally more reliable for ensuring all processes inherit the new group membership.
Security Considerations
Only add users to the `docker` group if you fully trust them and understand the security implications. In production environments or multi-user systems, it is often advisable to continue using `sudo` for Docker commands or to implement more granular access control mechanisms if available.
Conclusion
By following these steps, you ensure Docker is installed correctly on Ubuntu 26.04 using the official repository, providing access to the latest features and updates. Remember to carefully consider the security implications before granting access to the `docker` group.