The Stash Dance is Over
You're deep in a complex refactor, half the call sites updated, tests intentionally broken. Suddenly, a critical bug report lands: production is down. The fix needs to go on main, and it can't wait for your rework. Your standard procedure? The dreaded stash dance: git stash, switch branches, fix the bug, push, switch back, git stash pop. Usually, it applies cleanly. But when it doesn't, you're resolving conflicts in work you barely remember, in a state where 'correct' is a fuzzy concept.
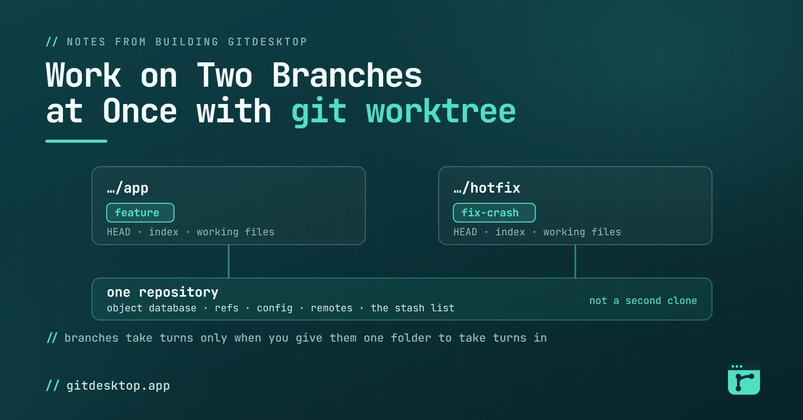
This whole scenario hinges on a single assumption: a Git repository has one working tree. You can only be on one branch at a time. This assumption became optional in 2015 with the release of Git 2.5, which introduced git worktree.
A Second Folder, Same Repository
git worktree allows you to maintain multiple working directories, each linked to the same Git repository, but checked out to different branches. This means you can have your long-running feature development in one directory and a hotfix for production in another, simultaneously. No more context switching pain, no more complex stashing. Your messy, half-finished work stays exactly where it is, in its own directory, while you tackle an urgent task in a clean, separate checkout.
The core command is straightforward: git worktree add <path> <branch>. For example, to create a new working tree for a hotfix on the main branch in a directory named hotfix next to your main project directory, you'd run:
git worktree add ../hotfix main
This command does two things: it creates the ../hotfix directory and checks out the main branch into it. Crucially, this new directory is linked to your existing Git repository. Commits made in the hotfix directory are recorded in the same repository history, just on the main branch.
Managing Multiple Worktrees
Once you have multiple worktrees, you need a way to manage them. The git worktree list command shows you all active worktrees, their associated branches, and their file paths. This is your central dashboard for keeping track of your parallel development environments.
git worktree list
Output might look like this:
/path/to/your/repo       main        [master]
/path/to/your/repo/hotfix  main        [hotfix]
/path/to/your/repo/feature X.Y.Z [my-feature]
When you're finished with a branch or a specific working tree, you can remove it using git worktree remove <path>. For instance, to clean up the hotfix directory:
git worktree remove ../hotfix
This command removes the directory and cleans up the Git configuration that tracks the worktree. It's important to ensure you've committed or stashed any work in that directory before removing it, as the directory itself will be deleted.
Worktree vs. Other Git Operations
It's important to distinguish git worktree from other Git operations like cherry-pick or branching itself. A standard branch allows you to diverge from the main line of development within the same working directory. You switch between branches, and each switch updates your working tree to reflect the state of the target branch.
git cherry-pick, as described in Source 2, copies a specific commit from one branch to another. It applies the *diff* of that commit as a *new* commit on your current branch. This is useful for moving individual fixes or small features without merging entire branches. However, it doesn't provide a separate working environment.
git worktree, on the other hand, provides entirely separate directories. Each directory has its own independent working tree, allowing you to edit, build, and test code for different branches simultaneously without interference. This is particularly powerful when you need to work on a stable branch (like main) while also developing a long-running feature on another branch, or when you need to debug a production issue without disrupting your feature development.
When to Use Worktree
The primary use case for git worktree is precisely the scenario described in Source 1: an urgent, high-priority task arises while you're in the middle of significant, potentially unstable work. Instead of risking a messy stash or a partial commit, you can spin up a new worktree for the urgent task.
Consider these situations:
- Hotfixes: As detailed, an urgent production bug requires immediate attention. Create a worktree for the fix on
main. - Parallel Feature Development: You need to start a new, unrelated feature but don't want to interrupt your current work on another branch.
- Testing and CI/CD: You might set up separate worktrees for different testing environments or build configurations.
- Code Reviews: Reviewing a colleague's large feature branch? Check it out into a separate worktree to avoid disrupting your own development.
The key benefit is isolation. Each worktree is a self-contained environment. Changes in one do not affect the others, beyond the fact that they all share the same underlying Git repository history.
Undoing Commits and Worktrees
Source 3 discusses undoing commits, emphasizing the importance of understanding the state of your changes (working tree, staged, committed, pushed) and whether others have the changes. While git worktree doesn't directly change how you undo commits, it impacts the context. If you need to undo a commit made in a specific worktree, you'll perform the undo operation (e.g., git reset) within that worktree's directory. The underlying Git repository tracks these changes, and the undo operation will affect the branch associated with that worktree. Remember, if the worktree's branch has been pushed, undoing commits becomes more complex, especially if others have already pulled those changes.
The Power of Isolation
git worktree fundamentally changes how developers can manage their workflow. It removes the artificial constraint of a single working tree, enabling true parallel development within the same repository. The days of the stressful stash dance are over for many common scenarios. By leveraging worktrees, developers can maintain cleaner branches, respond faster to urgent issues, and manage complex projects with greater ease and less risk of error.