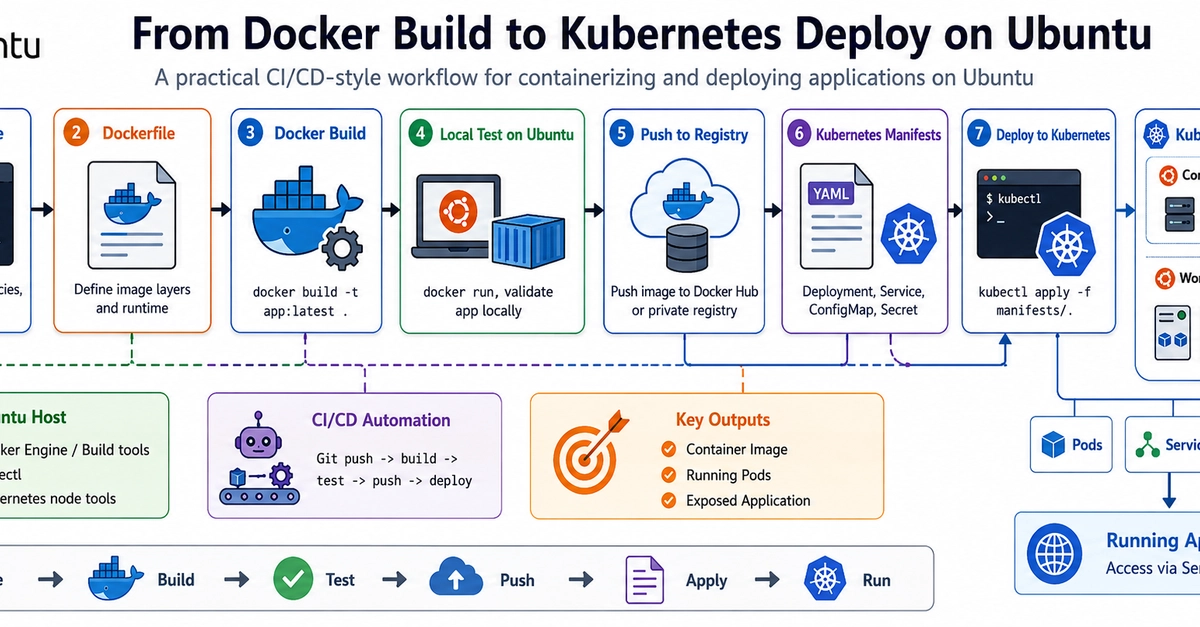
Amidst the ongoing discussions and shifts surrounding container runtimes and dockershim, a critical truth has been largely overlooked: the fundamental workflow for building container images with Docker and deploying them to Kubernetes on Ubuntu has remained remarkably stable. Docker continues to excel as a build tool, Kubernetes reliably orchestrates OCI-compliant images, and the development loop on Ubuntu is as clean and efficient as ever. This article details that end-to-end process.
Building Efficient and Secure Docker Images
The first step in the workflow is crafting a Dockerfile. For production environments, especially when deploying to Kubernetes, adopting multi-stage builds is paramount. This technique significantly reduces the size of the final runtime image and, crucially, minimizes the attack surface. In a Kubernetes cluster, an image is pulled onto every node where a pod is scheduled. A smaller image means less data transfer and fewer potential vulnerabilities exposed on each node.
Consider a typical Go application. A multi-stage build starts with a larger image containing the Go SDK (e.g., golang:1.22) for compilation. The build process, including dependency management (go mod download) and compilation, occurs within this first stage. The compiled binary is then copied into a lean, final runtime image, often based on a minimal OS like Alpine or even just a scratch image, containing only the necessary executable and runtime dependencies. This separation ensures that build tools and intermediate artifacts do not persist in the image that actually runs in production.
# build stage
FROM golang:1.22 AS build
WORKDIR /src
COPY go.* ./
RUN go mod download
COPY . .
RUN go build -o /app/main .

# runtime stage
FROM alpine:latest AS runtime
WORKDIR /app
COPY --from=build /app/main .
EXPOSE 8080
CMD [ "./main" ]
This Dockerfile structure ensures that the final image, runtime, is significantly smaller than the build stage. It contains only the compiled binary and the necessary runtime environment for the application to execute, along with the exposed port and command to run. The build artifacts, Go compiler, and source code are discarded, leading to a leaner, more secure deployment artifact.
Local Development and Testing
Before pushing to a registry and deploying to Kubernetes, developers need a robust local development loop. Docker Desktop on Ubuntu provides an excellent environment for this. The docker build command compiles the Dockerfile into an image, and docker run allows for immediate testing. This rapid feedback cycle is crucial for productivity.
The command docker build -t myapp:latest . creates the image locally. Subsequently, docker run -p 8080:8080 myapp:latest starts a container from that image, mapping host port 8080 to the container's exposed port 8080. This allows developers to interact with their application as if it were running on a remote server, catching issues early. This local testing phase is indispensable for ensuring the image behaves as expected before it moves to more complex environments.
Pushing to a Container Registry
Once the image is built and locally verified, the next step is to make it accessible to Kubernetes. This involves pushing the image to a container registry. Docker Hub, Google Container Registry (GCR), Amazon Elastic Container Registry (ECR), or a self-hosted registry like Harbor are common choices. The process is straightforward using the Docker CLI.
First, the image must be tagged with the registry's address. For example, if using Docker Hub and your username is myuser, you would tag the image as myuser/myapp:v1.0.0. The command is docker tag myapp:latest myuser/myapp:v1.0.0. After tagging, the image can be pushed using docker push myuser/myapp:v1.0.0. This uploads the image layers to the specified registry, making them available for Kubernetes to pull.
Deploying to Kubernetes
The final stage is deploying the containerized application to Kubernetes. This is typically managed through Kubernetes manifest files, most commonly written in YAML. A Deployment object is the standard way to manage stateless applications. The Deployment defines the desired state, including the container image to use, the number of replicas, and update strategies.
A minimal Kubernetes Deployment manifest for our Go application might look like this:
apiVersion: apps/v1
kind: Deployment
metadata:
  name: myapp-deployment
spec:
  replicas: 3
  selector:
    matchLabels:
      app: myapp
  template:
    metadata:
      labels:
        app: myapp
    spec:
      containers:
      - name: myapp-container
        image: myuser/myapp:v1.0.0
        ports:
        - containerPort: 8080
This manifest specifies that three replicas of the myapp application should run, using the image myuser/myapp:v1.0.0. The kubectl apply -f deployment.yaml command applies this configuration to the Kubernetes cluster. Kubernetes then ensures that the specified number of pods are running, pulling the image from the registry if it's not already present on the node.
The surprising detail here is not the workflow itself, which is well-established, but how little it has been impacted by the broader container runtime changes. While the underlying orchestration layer might evolve (e.g., moving away from Docker Engine as the direct runtime via dockershim), the developer's interaction with Docker for building and the declarative nature of Kubernetes for deploying remain the consistent, reliable pillars of modern application deployment on Ubuntu. The core loop—build, tag, push, deploy—is as straightforward as it has ever been for developers leveraging these powerful tools.