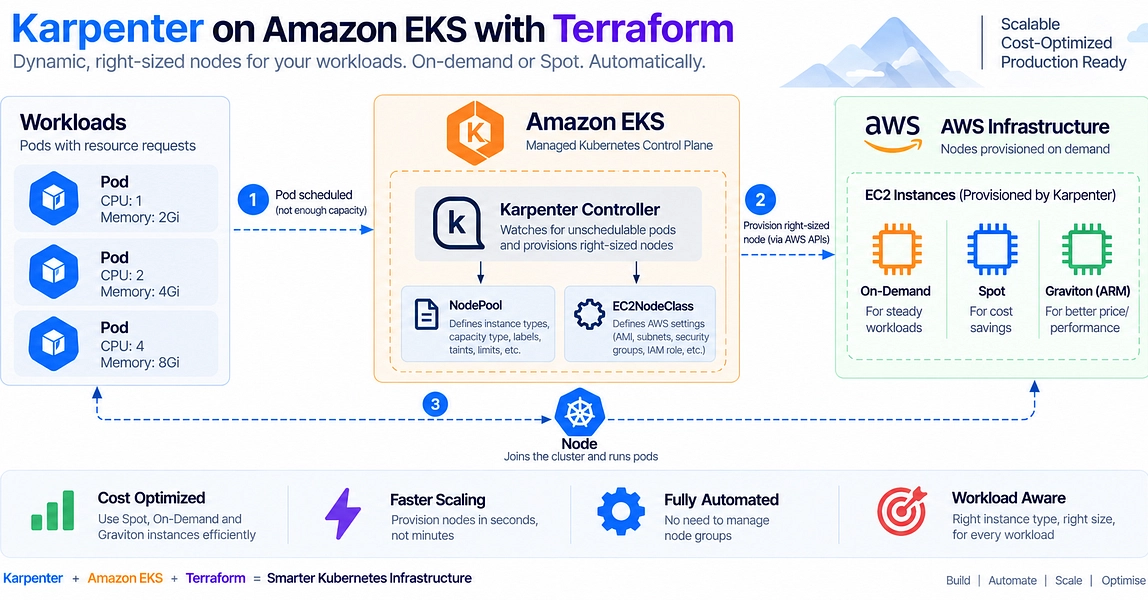
Automating EKS Node Provisioning with Karpenter
Managing Kubernetes cluster capacity on Amazon EKS traditionally involves a multi-step process. You’d configure the Kubernetes scheduler to place pods, then rely on the Cluster Autoscaler to watch for unscheduled pods and adjust the size of your AWS Auto Scaling Groups (ASGs). This often meant over-provisioning instances to ensure capacity was available, leading to wasted spend, or waiting for the autoscaler to react, causing scheduling delays. Karpenter fundamentally changes this by directly integrating with the Kubernetes scheduler and AWS EC2.
Instead of managing ASGs, Karpenter observes pods that cannot be scheduled due to insufficient resources. It then directly provisions the exact EC2 instance type and size required to satisfy those pending pods. This eliminates the guesswork and latency associated with traditional autoscaling methods. The core idea is to launch only the necessary capacity, precisely when it's needed, and terminate it when it's no longer utilized. This approach promises significant cost savings and improved application responsiveness.

How Karpenter Works
Karpenter operates as a Kubernetes controller. When the Kubernetes scheduler cannot place a pod because no node has sufficient resources, Karpenter intercepts this event. It analyzes the pod's requirements (CPU, memory, GPU, storage, taints, tolerations, node selectors, etc.) and queries AWS for available EC2 instance types that can meet these demands. It considers factors like instance availability, pricing, and your defined constraints.
Once Karpenter identifies suitable capacity, it launches new EC2 instances. It does this by directly interacting with the EC2 API, bypassing the need for traditional ASGs. After the new instance is launched and registered with the EKS cluster, Kubernetes can schedule the pending pods onto it. Karpenter continues to monitor the nodes it manages. If nodes become underutilized or if pods can be consolidated onto fewer nodes, Karpenter will cordon and drain those nodes, eventually terminating the underlying EC2 instances to reduce costs.
This differs significantly from the Cluster Autoscaler. Cluster Autoscaler primarily works by adjusting the desired capacity of existing ASGs. If a pod can't be scheduled, it increases the ASG count. If nodes are underutilized, it may suggest scaling down, but its decision-making is often based on aggregate node utilization rather than direct pod requirements. Karpenter's approach is more granular and responsive, focusing on the immediate needs of unschedulable pods.
Why Choose Karpenter?
The primary drivers for adopting Karpenter are cost optimization and improved scheduling performance. By provisioning only what is needed, Karpenter minimizes the amount of idle EC2 capacity running in your EKS cluster. This can lead to substantial savings, especially for workloads with fluctuating resource demands or diverse instance type requirements.
Furthermore, Karpenter's direct provisioning model reduces the time it takes for new capacity to become available. Instead of waiting for an ASG to launch an instance and for the node to join the cluster, Karpenter can provision and register a node much faster. This is critical for applications that require rapid scaling to handle sudden traffic spikes or batch processing jobs that need immediate compute resources.
Karpenter also offers more flexibility. It can launch a wider variety of EC2 instance types than might be configured in a traditional ASG setup, allowing you to find the most cost-effective and performant options for specific workloads. Its provisioning logic is extensible, enabling custom constraints and logic for more sophisticated cluster management.
Setting Up Karpenter with Terraform
Managing your EKS cluster and its components with Terraform provides an infrastructure-as-code approach, ensuring consistency and repeatability. Here’s a high-level overview of the Terraform setup for Karpenter.
Prerequisites
Before you begin, ensure you have the following:
- A functional Amazon EKS cluster.
- Terraform version 1.11 or later.
- An existing VPC with subnets.
- Appropriate security groups configured.
- Helm v3+ installed.
kubectlconfigured to connect to your EKS cluster.- AWS CLI with valid credentials.
Terraform Configuration Steps
You'll typically use the Helm provider in Terraform to install Karpenter. This involves defining a Helm release resource that points to the Karpenter Helm chart.
First, you need to configure the Helm provider and add the Karpenter Helm repository. This is usually done within your Terraform configuration files (e.g., main.tf or providers.tf).
provider "helm" {
  kubernetes {
    config_path = "~/.kube/config"
  }
}

resource "helm_release" "karpenter" {
  name       = "karpenter"
  repository = "https://aws.github.io/eks-charts"
  chart      = "karpenter"
  version    = "0.27.0" # Use the latest stable version
  namespace  = "kube-system"

  set {
    name  = "serviceAccount.create"
    value = "true"
  }
  set {
    name  = "serviceAccount.name"
    value = "karpenter"
  }
  set {
    name  = "settings.clusterName"
    value = "your-eks-cluster-name"
  }
  set {
    name  = "settings.region"
    value = "your-aws-region"
  }
  set {
    name  = "settings.webhook.port"
    value = "9443"
  }
  set {
    name  = "controller.resources.requests.cpu"
    value = "100m"
  }
  set {
    name  = "controller.resources.requests.memory"
    value = "128Mi"
  }
  set {
    name  = "controller.resources.limits.cpu"
    value = "100m"
  }
  set {
    name  = "controller.resources.limits.memory"
    value = "128Mi"
  }
  set {
    name  = "aws.defaultInstanceProfile"
    value = "arn:aws:iam::ACCOUNT_ID:instance-profile/KarpenterInstanceProfile-YOUR_CLUSTER_NAME"
  }
}
IAM Permissions
Karpenter requires specific IAM permissions to manage EC2 instances, launch templates, and other AWS resources. You need to create an IAM role for the Karpenter service account. This role must be associated with the Kubernetes service account that Karpenter will run under.
The Karpenter documentation provides a comprehensive IAM policy. In Terraform, you would typically define this IAM role and policy using the aws_iam_role and aws_iam_policy_document resources, then create an IAM OIDC provider for your EKS cluster and associate the role with the Karpenter service account using annotations.
A simplified example of the IAM role and policy for Karpenter:
data "aws_iam_policy_document" "karpenter_assume_role" {
  statement {
    effect  = "Allow"
    actions = ["sts:AssumeRoleWithWebIdentity"]
    principals {
      type        = "Federated"
      identifiers = ["arn:aws:iam::ACCOUNT_ID:oidc-provider/oidc.eks.us-west-2.amazonaws.com/id/YOUR_OIDC_PROVIDER_ID"]
    }
  }
}

resource "aws_iam_role" "karpenter" {
  name               = "KarpenterEC2Role-YOUR_CLUSTER_NAME"
  assume_role_policy = data.aws_iam_policy_document.karpenter_assume_role.json
}

# You would then attach the Karpenter managed IAM policy (e.g., 'AmazonEKSKarpenterNodePolicy')
# or a custom policy with the necessary permissions.
resource "aws_iam_role_policy_attachment" "karpenter" {
  policy_arn = "arn:aws:iam::aws:policy/AmazonEKSKarpenterNodePolicy"
  role       = aws_iam_role.karpenter.name
}
After applying these Terraform configurations, run terraform apply. This will install Karpenter into your EKS cluster.
Conclusion
Karpenter offers a more efficient and cost-effective way to manage node autoscaling on EKS compared to the traditional Cluster Autoscaler. By directly provisioning EC2 capacity based on pod scheduling needs and automatically cleaning up underutilized nodes, it optimizes resource utilization and reduces cloud spend. Leveraging Terraform for its deployment ensures that your cluster infrastructure is managed as code, providing a robust and repeatable setup.