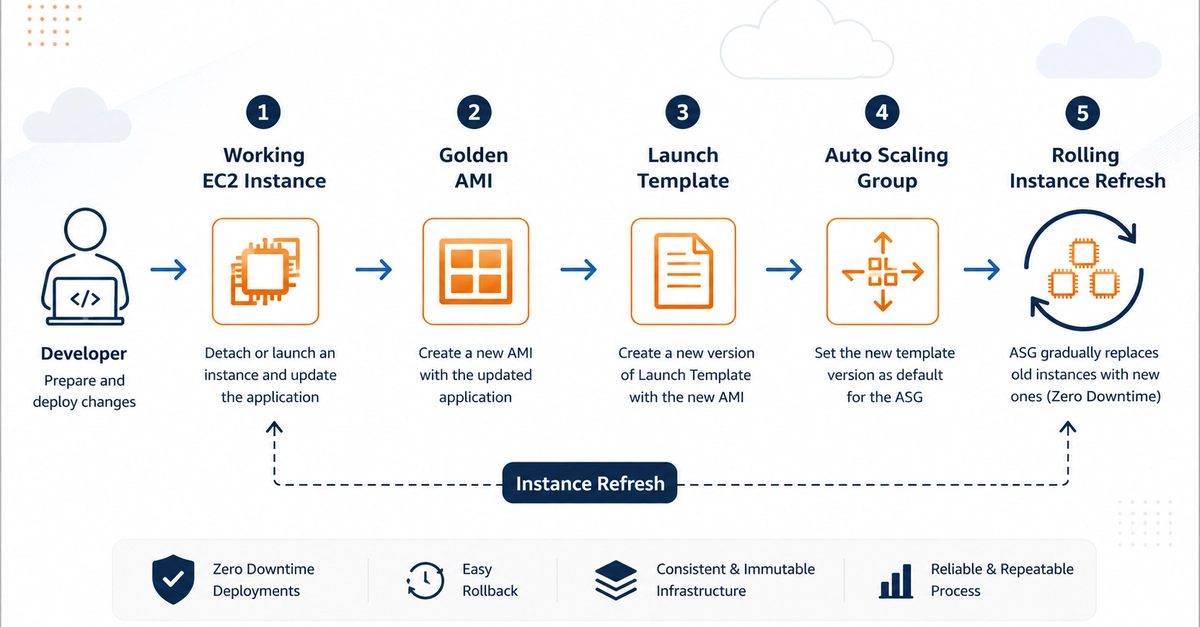
The Challenge of Updating EC2 Instances in Auto Scaling Groups
Managing applications deployed on Amazon EC2 Auto Scaling Groups (ASGs) presents a common challenge: how to deploy updates without introducing manual errors or downtime. Traditional methods like SSHing into individual instances and running updates are prone to configuration drift. Each server can end up with subtle differences, making troubleshooting and replication difficult. This inconsistency is a significant risk in dynamic cloud environments.
A more robust and scalable approach involves creating a pristine, updated instance, capturing its state as an Amazon Machine Image (AMI), and then using that AMI to launch new, identical instances. This is the core of the "Golden AMI" strategy. It ensures every instance in your ASG is a perfect replica of the desired state, drastically reducing deployment risks and simplifying rollback procedures.
Why Golden AMIs Are Superior
The "Golden AMI" approach offers several key advantages over manual instance updates or other more complex deployment pipelines. Firstly, it guarantees consistency. When you build a new AMI, you are creating a known, verified state. Any new instance launched from this AMI will be identical to others created from the same image. This eliminates "it works on my machine" scenarios and reduces the likelihood of deployment failures due to environmental discrepancies.
Secondly, it simplifies rollbacks. If a new deployment introduces a bug, you can quickly revert to the previous Golden AMI. The ASG can then terminate the problematic instances and launch new ones from the older, stable image. This is far more efficient and less error-prone than attempting to uninstall or patch faulty deployments on running instances.
Thirdly, it minimizes configuration drift. Over time, manually updated servers can accumulate differences in installed packages, configuration files, or running services. A Golden AMI, built from a clean, controlled environment, inherently combats this drift. It forces a structured update process where the entire instance state is refreshed.
Finally, it integrates well with automation. While the initial creation of a Golden AMI might involve some manual steps, the process of updating the ASG to use the new AMI can be fully automated, fitting into CI/CD pipelines.
Step 1: Prepare a Work Instance
The process begins with a single EC2 instance. This instance serves as the base for your new Golden AMI. You'll launch a standard EC2 instance based on your current ASG's base AMI, or a fresh one if you're making significant base OS changes. Ensure this instance is in a state that allows you to connect to it, typically via SSH.
Once connected, you perform all the necessary application updates. This includes:
- Updating the operating system packages.
- Downloading and installing the latest version of your application.
- Applying any necessary configuration changes.
- Setting up application services to start automatically on boot.
- Performing any prerequisite software installations (e.g., databases, caching layers, language runtimes).
This is your chance to ensure everything is perfectly configured. Think of this instance as a staging ground for your next production image.
Step 2: Verify the Work Instance
Before creating an AMI, rigorous verification is crucial. This is the most critical step to ensure the quality of your Golden AMI. Log into the work instance and thoroughly test your application. Ensure that:
- The application starts correctly.
- All core functionalities are working as expected.
- Dependencies are met and services are running.
- Logs are being written correctly and do not show critical errors.
- The instance's security posture is correct (e.g., firewall rules, user permissions).
This manual verification might seem tedious, but it's the safeguard against deploying broken code or configurations. If you have automated tests that can be run against a deployed instance, now is the time to execute them. The goal is to be absolutely confident that this instance represents a stable and functional deployment.
Step 3: Create the Golden AMI
Once you are satisfied with the state of your work instance, you can create an AMI from it. This process captures the entire disk state of the instance, including the operating system, installed applications, and configurations, into a reusable image.
In the AWS Management Console, navigate to the EC2 dashboard, select your work instance, and choose "Actions" > "Image and templates" > "Create image". Give your AMI a descriptive name and a clear description. Including the application version, date, and perhaps a brief note about the changes made in the description is highly recommended. For example: "App v2.1.0 - Updated dependencies, fixed critical bug XYZ - 2023-10-27".
AWS will then create the AMI. This can take several minutes, depending on the size of the instance's volumes. You can monitor the AMI creation progress in the "AMIs" section of the EC2 console.
Step 4: Update the Auto Scaling Group Launch Configuration/Template
With your new Golden AMI ready, you need to tell your Auto Scaling Group to use it for launching new instances. This is done by updating the launch configuration or launch template associated with your ASG.
Navigate to the Auto Scaling Groups section in the AWS console. Select your ASG, then go to the "Details" tab and click "Edit". You will find settings for "Launch configuration" or "Launch template". If you are using launch configurations (older method), you'll need to create a new one referencing your new AMI ID. If you are using launch templates (recommended), you will create a new version of your existing launch template, specifying the new AMI ID.
It's crucial to use a launch template over a launch configuration as templates offer more features and versioning capabilities. When creating a new version of the launch template, ensure all other settings (instance type, security groups, key pairs, user data) remain the same as your previous version, unless those also need updating.
Referenced Sources
- verified